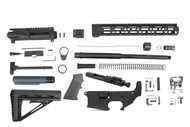
How To Build an AR-15 Rifle - (START BUILDING YOUR AR-15)
Posted by Reposted - Midway USA on Jul 6th 2021
DECIDING WHICH AR-15 TO BUILD
Before you buy your first part, decide what kind of rifle you want. Will you be varmint hunting, plinking or competition shooting? Once you make this decision, you know what type of upper receiver and barrel you will use. The upper receiver and barrel you choose will determine the remaining parts needed.
Here are several types of stripped upper receivers, each with different features for different applications.
AR-15 A1
Has a fixed carry handle, shell deflector and requires the installation of the forward assist assembly, ejection port cover assembly and the A1 sight assembly that allows only for windage adjustment. This upper is ideal to build a "Retro" civilian version of the Vietnam era M-16 Rifle..
AR-15 A2
Has a fixed carry handle, shell deflector and requires the installation of the forward assist assembly, ejection port cover assembly and the A2 sight assembly that allows for windage and elevation adjustments. This is a popular upper to use for building a rifle for use in shooting matches.
AR-15 A3
Has a flattop with picatinny rail, shell deflector and requires the installation of the forward assist assembly and ejection port cover assembly. This is the current military upper and is used to build a civilian copy of the M4 (carbine with 16" barrel) or M-16 A4 (rifle with 20" barrel). Also great for building any type of Varmint or Target Carbine/Rifle since any type of optic can be mounted to the Flattop.
AR-15 Flattop
Has many configurations for the upper receiver with various heights of picatinny rails for mounting scopes. These generally do not accommodate the forward assists or Ejection Port Cover assemblies or also known as the "Slick-Sided" uppers. The Flattop is great for building any type of Varmint or Target Carbine/Rifle since any type of optic can be mounted to the Flattop.
PURCHASING AR-15 PARTS
Now that we have selected the type of upper receiver (A3), we know we need the forward assist assembly and Ejection Port Cover assembly. These parts would not be required had we selected a Flattop. In addition, since we are using a bull barrel with a free-float hand guard and without sights, we need a gas block but do not need a flash hider. Had we decided to use open sights, your front sight would have had the gas block built in. The free-float hand guard does not require the use of a delta pack or hand guard cap, as these are integral to the Free Float Tube hand guard.
BEFORE YOU BUILD YOUR AR-15
Please remember these important things:
- Safety - Always remember to wear safety glasses. Pins and springs can (and probably will) fly across the room. A shop apron is also helpful to protect your clothing.
- Work Surface -Be sure to work in a well-lit area with plenty of clear, clean workbench area. Place a mat like the Tipton Gun Cleaning and Maintenance Mat over your work area to keep parts from rolling around or getting lost. The mat will also help protect your guns and parts from potential damage.
- Floor Area - Since we are working with several springs and small pins, it is likely some of these small parts will find their way to the floor. If you have a clean floor or even if you place a white towel or some plain covering on the floor, it will be easier to find these small parts. Nothing is more frustrating than having to delay your project because a $ 0.99 roll pin vanishes.
- Tools -There are several tools necessary to do a professional job. Please don't skimp here, as the quality of your work will suffer. Use the right tool for the job. Try to use brass punches whenever possible to reduce the chance of marring the finish.
START BUILDING YOUR AR-15
Make sure you have a good AR-15 schematic to use as a guide in assembling your upper assembly. The schematic is helpful in finding the correct names of parts and determining what they look like.
Spread out your Tipton Cleaning and Maintenance Mat
- Arrange all your tools on your workbench so they are easy to access.
- Arrange all your parts on your mat.
- Group your parts together by assembly or with related parts. Refer to the pictures to aid you in this grouping process.

 US Dollars
